[00:00] Hi, everyone.
[00:04] This is me testing out ScreenStudio to go over
[00:08] this cool app that I created called Blueberry
[00:12] IDP, it's an internal deployment
[00:15] platform to create ephemeral environments
[00:20] so that whenever a team has
[00:23] CI running, they can go
[00:27] and deploy ephemeral environments,
[00:31] essentially spin up their app with some configuration.
[00:35] I run some tests on it, see if everything succeeds, there's
[00:39] connectivity, whatever it is, and then the environment
[00:42] is taken down. Usually, you're making
[00:46] changes to your code pretty often,
[00:50] so those environments don't have to live for too long.
[00:54] After around 24 hours, those environments are deleted, and there's going to be
[00:57] a lot of environments, every single commit that you push to your repository
[01:01] will trigger an environment. Let's
[01:05] dig in. Let's sign
[01:09] in. Right now, I'm going to sign in with my
[01:13] preexisting email and password.
[01:18] However, you can sign up as well.
[01:22] There's a get started button. I still want to save my password.
[01:27] Cool. Here we are. This is the main dashboard.
[01:31] Let's take a look at
[01:35] our system status.
[01:39] Here we are. All systems operation are functional. When this is running
[01:42] in Kubernetes, right here, you
[01:46] will see the Docker image.
[01:50] That's good for verifying what version of the code you're
[01:54] looking at. Here, it'll show any environment variables that are
[01:58] running within the blueberry environment. That's really useful.
[02:02] It'll show whether we're able to connect
[02:06] to all these other backing services
[02:10] that we need, like our cache,
[02:14] our data store, our container
[02:18] registry, our secret manager,
[02:22] things like that. It's pretty
[02:26] cool. I see that I have a secret token here.
[02:30] I'm going to have to update this.
[02:35] Let's take a look
[02:39] at repositories.
[02:44] The way that this application is set up, the idea is that there is one backend
[02:48] service, and there are multiple front-end services
[02:52] that connect to that backend. Whenever we are creating an ephemeral
[02:55] environment, there will always be at least a backend. There
[02:59] don't need to be any front-ends deployed, but at least
[03:03] a backend is deployed. I created
[03:06] some sample applications. Let's see.
[03:11] What happened here? Blueberry.
[03:17] Here it is. I
[03:20] created three applications
[03:25] to show how this
[03:29] all works. Our backend application,
[03:32] the default one here, and then two different
[03:36] front-ends that I've confirmed connect
[03:40] to the backend when I'm
[03:44] running on Docker compose.
[03:49] Those repositories, they're configured somewhere. I can go over that
[03:53] in a different moment or a different chat.
[03:56] These are the three repositories
[04:00] that are configured. We can deploy the backend with any
[04:04] of these two front-ends, and even both front-ends.
[04:08] Here we have a link to the repository in GitLab.
[04:12] That can be really useful. We can see
[04:16] our GitLab pipelines for the
[04:20] repository. We can see that
[04:23] the default branch is main,
[04:27] but in terms of the latest commit to this
[04:31] repository, it's actually this
[04:35] commit. Thankfully, that run passed.
[04:39] That's great. Now that we see our repositories,
[04:43] I hadn't seen this. I got
[04:47] to remove this button. Those
[04:51] are the repositories. Something
[04:55] has occurred. These are the repositories we can
[05:00] deploy. Now let's take
[05:04] a look at an environment.
[05:09] These are some environments that already exist. Let me
[05:13] show you how to create an environment. We'll just
[05:16] create one right now. We'll
[05:20] call it demo one.
[05:24] For right now, we're just going to use the defaults. You can see that
[05:27] automatically a backend repository was chosen, our
[05:31] sample backend one. By default, it's going
[05:34] to deploy whatever is the latest commit on main.
[05:38] Right now, that commit happens to be this one. It checks
[05:42] that there's a corresponding Docker image that exists, which
[05:46] is totally needed. Otherwise, we can't deploy our instance.
[05:50] This may happen if you just push a change and your
[05:54] build pipeline is still running and it hasn't yet pushed the
[05:58] Docker image. We cannot create manually or
[06:02] any other way for that matter in environment
[06:06] unless the image exists or rather
[06:11] when that image exists.
[06:15] Right now, it's only selected a sample backend one,
[06:20] but we can also choose to run a front end.
[06:23] I think I'm going to run both of these front
[06:27] ends. You can see here that it's defaulting to the main
[06:31] branch for both. These are the good messages for
[06:35] those commits. For right now, I'm okay with
[06:38] it here, but I can put in a commit shot there. Short,
[06:42] long, doesn't matter. This will be able to tell and
[06:45] it'll check whether a Docker image exists.
[06:50] Let's create an environment. Awesome.
[06:57] The environment
[07:03] was created and we're immediately taken to
[07:06] the dashboard for that environment. Right
[07:11] away, we can see in the overview that we are
[07:14] given these links. Eventually, once the
[07:18] different apps are up, we can go to these endpoints, to
[07:22] these URLs, and we can access the app there.
[07:26] We can also see the versions of those services
[07:30] that were deployed. It'll tell you the
[07:34] commit and the commit message. A pretty
[07:38] key thing is that Docker images are tagged
[07:41] with the commit shot. You push a change
[07:45] and that has a commit shot, some unique hash.
[07:49] That same hash is attached to the Docker image
[07:53] that is built from the version of the code
[07:57] known as your unique hash.
[08:01] That will show that.
[08:05] Right now, they're not yet up. Even if we
[08:08] click on this, we're not going to be able to see anything. We can click here and we can
[08:12] go to Argo CD and we can take a look at how
[08:16] our deployment is doing by looking at
[08:19] the Argo CD UI. However, I'm
[08:23] not a huge fan of the UI. It's not
[08:27] super intuitive at first. Or maybe
[08:31] when I was learning it, there
[08:35] was just a lot going on. Just quickly,
[08:39] this application uses home. We know that there are Kubernetes
[08:43] manifests. There are specific YAML files with specific
[08:47] schemas. Let's say that you want
[08:50] to create a configuration map resource.
[08:55] You would create a YAML file. You
[08:58] would put API v1, kind config
[09:02] map, name, backend app, config
[09:06] map, let's say. Help charts allow
[09:10] you to create templates out of these
[09:13] manifest. You can pass in values
[09:17] to create that template.
[09:21] The thing about help charts is that they always have a values
[09:25] file which sets all the defaults.
[09:29] What you can do when you use a help chart and this is how they work is you provide
[09:33] overrides for the help chart. You have your default values
[09:37] and then if you provide,
[09:41] let's say our help chart has
[09:45] this field, environment.
[09:50] It has a namespace. Maybe the default
[09:53] value for a namespace is just an empty string.
[09:58] If we then provide an override, let's say we create
[10:02] another file and we type in environment namespace
[10:06] and we provide this value, when we create
[10:10] a helm release, those overridden values
[10:14] will be shown. We can see here
[10:18] the help chart values, what they look like
[10:21] at the end after rendering the values
[10:26] from the overrides. We can also see here the
[10:29] activity logs. You can see we're keeping track of who created
[10:33] the environment, what the status of the Argo CD
[10:37] application is. Just to quickly
[10:40] go over that, in order to not
[10:44] have to manage when we create a deployment,
[10:49] because we're not only creating a deployment
[10:53] resource with, let's say one pod, we're also
[10:57] creating secrets, we're creating configuration
[11:01] maps. When we want to both create, modify,
[11:05] and delete any of those resources,
[11:08] we don't really want to be managing that
[11:12] manually and so we're using Argo CD for that.
[11:15] We create an Argo CD application and depending
[11:19] on the annotations that the application
[11:23] has, it'll know how to manage the state
[11:26] of the application. You can send an HTTP request and you can say
[11:30] create a patch for this application that says
[11:34] that these resources can now be deleted,
[11:39] let's say. Then Argo CD will take care of
[11:43] deleting all those resources or modifying them, whatever it
[11:46] is that you chose.
[11:51] This UI is meant to make it a bit more intuitive to look
[11:54] at it. We can see here some of the Argo CD information,
[12:00] but just in a better way, in my opinion,
[12:03] we can look at Kubernetes resources that were created so we
[12:07] can filter, let's say, our backend. We can
[12:10] see that we have a service and this
[12:14] is the value of the services file
[12:18] or the services manifest rather.
[12:22] This is the full manifest. With
[12:25] a Helm chart, you don't need to set every
[12:30] single possible value. It's not
[12:33] really how it works. Some values
[12:38] are left empty and that means that you're not using that field, which means you're not creating
[12:42] certain things, things like that. We can also look at our
[12:45] events, which is pretty cool. It says here
[12:49] that DNS record provisioning succeeded.
[12:53] Here, it'll give you events for these different
[12:58] resources. So cool. DNS records updated.
[13:02] That's great. Let's look at our deployment.
[13:07] This is our manifest for the deployment. Let's look
[13:11] at the events. Scaled up.
[13:15] Finally, let's look at our ingress.
[13:21] You can see here how it's progressing.
[13:26] This ingress resource is still
[13:30] being provisioned.
[13:33] This is still not up.
[13:37] That's pretty important to know because
[13:42] using Argo CD, you can set the
[13:45] order of resources like
[13:50] startup. You can say,
[13:54] "Okay, I always want my back
[13:58] end application to be started first. If that application becomes
[14:02] healthy, then I want to create the
[14:05] front end apps." Right now,
[14:10] we can take a look at
[14:14] how our front end is doing.
[14:22] The React dashboard, right? We have the deployment, the ingresses,
[14:25] whatever. These are all for the front ends. We can see
[14:29] the status out of sync. We see that the namespace
[14:33] was created. But all these
[14:37] other resources are out of sync.
[14:41] That's because the ingress
[14:45] resource is not active yet for the back
[14:48] end, which means that the front
[14:52] end resources will not start up. That's something
[14:56] that the UI doesn't really tell you intuitively.
[15:00] It's important to know the help chart. We can also take
[15:04] a look at the pod logs, which is pretty cool. We can
[15:08] take a look at, let's see, MySQL.
[15:11] Another thing about this setup is that at least
[15:15] the client that I was working with, their
[15:19] back end connects to both MySQL instance
[15:23] and Redis cache. For the sample applications
[15:27] that I'm using for the demo,
[15:31] I also made sure that those
[15:35] apps hit those services as well. When we are ready to
[15:39] create the environment, we also need instances
[15:43] of those two services. We can take a
[15:46] look at the logs for the MySQL service
[15:51] here. We can take a look. Our pods
[15:54] will all be able to communicate with each
[15:58] other. We can take a look at the logs for
[16:02] Redis. Let's see the logs for my back end app that I created.
[16:06] Cool. Health check pass for database, it pass for Redis.
[16:10] We can see here that it's calling these
[16:14] endpoints, these health endpoints.
[16:18] The way that Kubernetes allows you to set
[16:22] up startup probes, liveness probes, readiness
[16:27] probes. The way that they work is you
[16:30] specify some endpoint. Let's say
[16:34] that your liveness probe, it can tell
[16:38] whether your application is up. It will hit an endpoint
[16:42] called /health. It will respond with
[16:45] service degraded or all operational things like
[16:49] that. Basically things that are on the status page.
[16:53] That's how it determines the status through all of the different services that it needs to connect
[16:57] to. That endpoint responds with the
[17:01] 200 success code to Kubernetes.
[17:05] Then Kubernetes, you set some interval. Let's
[17:09] say every five minutes, it's usually more than that.
[17:12] We'll say every five minutes it will hit that endpoint. If it was
[17:16] successful, then Kubernetes will just leave
[17:20] your pod up. If it hits that endpoint several
[17:24] times and it keeps getting failure codes,
[17:28] then Kubernetes will just bring your pod down,
[17:32] just destroy it because it will say, "I can't possibly run
[17:35] this. I'm not going to waste more resources." That's interesting
[17:39] to know about the pods. You can also take a look at events.
[17:43] This is really helpful. These are events from all
[17:46] the different resources in our Argo
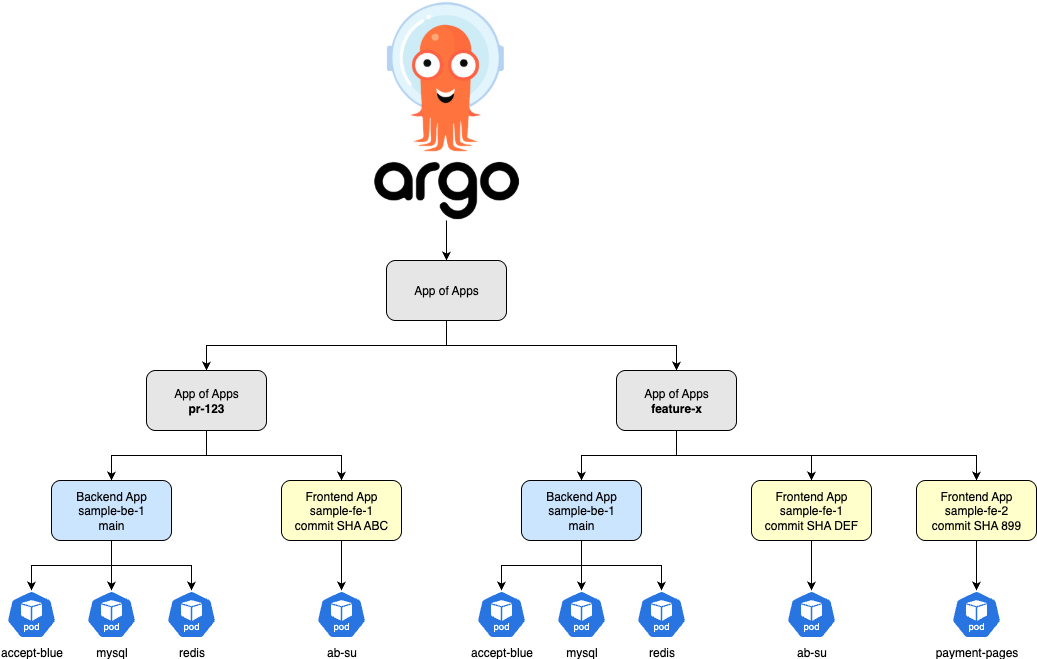
[17:50] CD application. Our Argo CD application,
[17:54] it follows this pattern of app of apps where you have a master
[17:58] app that manages other applications. For each
[18:01] environment, we create a master app called,
[18:05] let's say, ephemeral
[18:09] demo one. Then that one manages
[18:14] another application, which is
[18:17] the back end. Another application, which is the front
[18:21] end. These environment events are events coming from
[18:25] all of the resources that exist
[18:29] within our Argo CD application. In
[18:32] our case, each ephemeral environment is
[18:36] created in its own namespace. That's a good
[18:39] way to isolate and to know what you're looking at when you're
[18:43] debugging. Here we can see events from the back end pod.
[18:47] Here, it gives it some prefix, like
[18:51] ephemeral environment. Then here, it gave it the
[18:54] name of the environment that I added. Here,
[18:58] it added the component. This is the back
[19:02] end. Then here is a random hash because
[19:05] we want to make sure that we never have named
[19:09] clashes. We can see events from that pod.
[19:13] It was able to pull the image, create the pod, schedule
[19:17] it. Let's see. We can see that
[19:21] our deployment had to scale up the
[19:25] replica set to go from
[19:29] zero pods to one. Things
[19:34] like that. Those are the events.
[19:38] There can be a lot of events. Here, we just see
[19:41] some basic things. Here, we can take a
[19:45] look at the Helm values. These
[19:49] are the final Helm values
[19:53] that were used. This is what
[19:57] this environment uses for the Helm chart. There's
[20:00] one Helm chart. It's an environment Helm chart.
[20:04] Let's see. Here it is in charts. We have two charts
[20:08] in the repository, one for the actual blueberry application and
[20:12] one for the environment. Each environment that we create
[20:15] follows a certain template. In our case, that template is we
[20:19] have one back end deployment and we have one front end deployment
[20:23] and a second front end deployment. Every
[20:28] time that we create a helm release,
[20:32] let's say, we create a new environment.
[20:36] It will create all these resources.
[20:40] These are all the default values for the chart. That means if
[20:44] you don't override them, it will just use these
[20:48] values. For example, let's
[20:52] see. Did we override anything here?
[20:56] Yeah. You can see
[21:00] here, the environment name
[21:04] says ephemeral demo one. However,
[21:10] environment name here is empty. We did
[21:13] override that value. Cool.
[21:19] That is the main functionality for creating the environments.
[21:24] That's the main of it. I'll
[21:28] also go over just a two more features
[21:33] that we have. I mentioned that we create these
[21:36] releases, these deployments. Of course,
[21:40] they each have their own set of or
[21:44] rather there's a default set of values.
[21:48] The default set of values is a combination of what
[21:52] we have in the default values YAML as
[21:56] well as some stuff that is
[22:00] injected.
[22:05] If we have overrides, we can create configuration sets so
[22:09] that we can use these preset overrides basically.
[22:12] For example, we have this override called front end
[22:16] two. All it does is disable front end one so
[22:19] that only front end two runs. We
[22:23] can create configuration sets.
[22:27] When we create a configuration set, there is this nice legend
[22:31] here. It's a preview and it'll tell you which values are
[22:35] set at runtime. You can't override them. Which
[22:39] ones are computed as well.
[22:43] There's a few that you can't override. For example, front end two,
[22:47] we're thinking about a company that only has
[22:51] one big back end application in multiple front ends
[22:54] that connect. That back end application clearly
[22:58] has many functionalities, whatever
[23:02] it is. For this company,
[23:06] they already know that they have,
[23:10] let's say, my dashboard, where
[23:14] another one could be like financial reporting.
[23:19] The whole point is that the
[23:23] applications that can possibly
[23:27] run in an environment,
[23:30] they're preset. These are the set
[23:34] of repos. There's only one back end and
[23:37] it's exactly at, it'll always
[23:41] be, this will always be the image
[23:46] repository. So we can't override
[23:50] that. If we wanted to change the repository
[23:54] that one of these applications is pointing
[23:57] to, we can go and change it in the master settings.
[24:01] Just any user that's coming in, they probably
[24:05] shouldn't be overriding those fields.
[24:08] You can see that, for example, this environment variable
[24:12] here, it says computed, basically at runtime, depending
[24:16] on what the, so this
[24:20] has to be fixed. But depending on,
[24:23] oh no, sorry, this is just a sample.
[24:27] But this is actually computed. This byte back end public
[24:31] URL computed means that from some other values, it's
[24:35] going to come up with this and it's going to set it itself.
[24:38] So for the computed variables, you don't really override
[24:43] them. But if you look at the chart, you can look at
[24:47] the template and see that they're really composed of other
[24:51] template variables. So that's how you can create a
[24:55] configuration set. And there's one
[24:58] more feature that we can use,
[25:02] which is pretty cool. We can create
[25:06] API tokens. So we can interact with
[25:10] Blueberry through the UI or through
[25:14] an API. And we would want to use API tokens
[25:17] to connect to the app, let's say from CI/CD.
[25:22] So let's say we have a GitLab pipeline, and
[25:25] we want that pipeline to create an environment.
[25:31] When let's say once front end two is has
[25:35] a new image and it's built, then we want
[25:39] to automatically create an environment where we're running just
[25:42] the back end and front end two. So we can hit
[25:46] an API endpoint. And we can send in some information.
[25:51] And it'll create that environment for us. So here we can create
[25:55] the API tokens. We can rotate them. Let's say somebody
[25:59] saw the token, it was exposed, so we can
[26:02] go ahead and just rotate it here. So that's
[26:07] pretty cool. And you can set
[26:10] the permissions that the token
[26:15] has. And delete them, of course.
[26:19] Let's see. There are a
[26:22] few features that I added.
[26:26] One of them being some Slack reporting.
[26:30] I just wanted to know what was going on. I wanted to hear the little
[26:34] Slack sound when a build was ready. So this
[26:38] was incorporated to the Blueberry app
[26:42] already. So I know, let's say there
[26:45] was obviously a push.
[26:49] And it had this commit.
[26:53] So it created this pipeline,
[26:57] which I can go to if I want to. And the message
[27:01] here is that it's starting to build a Docker image. So I want to know when it's
[27:05] building a Docker image. I want to know when that image was a
[27:08] success. Basically when
[27:12] I'm deployment ready.
[27:16] I got to cut down on these. And then I see
[27:20] when the pipeline finished. In case I have some other
[27:23] steps in there after building the image that
[27:28] I want to know about. I
[27:31] also receive notifications
[27:35] when an environment is
[27:39] created. So that's pretty cool.
[27:43] It'll give me the info. And then
[27:47] when they are deleted as well.
[27:51] Let's see if we can
[27:55] find a deleted one.
[28:00] Environment deleted. So when
[28:03] you're thinking about a company, maybe you wouldn't want to
[28:07] see every time an environment is deleted or created
[28:11] or every time that an image was
[28:15] built. But what I've seen in my career is
[28:19] people have exactly these channels and they just mute them and they just set
[28:22] special rules so that they can be notified
[28:26] based on some criteria. So we
[28:31] can do that.
[28:37] There's a lot that went into the setup. And
[28:41] I can go into that briefly. Let's look at our repository.
[28:45] We have a lot in our repository.
[28:49] So the Blueberry platform has
[28:53] Blueberry Terraform. So basically the
[28:57] Terraform code creates all the resources that it needs
[29:01] to run the application. It does assume that there's already
[29:05] a GCP organization and project created, but it creates
[29:08] the VPC, it creates the cluster, it creates service accounts.
[29:13] It creates a lot. Let's just quickly look at the
[29:17] modules here. It sets up Firebase.
[29:21] So Blueberry uses Firebase for authentication.
[29:25] So Firebase will manage the email and password
[29:29] and they'll manage the reset emails, the
[29:33] reset password emails, so that's nice.
[29:37] In here we also , we create some static
[29:41] IPs. So for example for
[29:44] Blueberry.Florenciacomuzzi.com, we always
[29:48] have this website up and so if we didn't have a static
[29:52] IP every time that this application updated, the
[29:56] IP of it would change. And when we're thinking
[30:00] about creating DNS records, so that when somebody
[30:04] goes to, let's say Blueberry.florenciacomuzzi.com,
[30:08] they're rerouted to a specific IP address. We need to
[30:12] have a static IP. So that'll create the static
[30:16] IP here. It'll create workload identity as well and that's
[30:20] because we want some of our, we want
[30:24] our applications to use workload
[30:28] identity. Basically anything that is running within Kubernetes,
[30:32] we want it to use workload identity because
[30:36] that way we don't have to actually
[30:40] load credentials files into
[30:44] our environment. It'll just know it's
[30:48] workload identity, it'll identify the
[30:52] workload. There are some secret manager secrets
[30:56] that have to be created that we want to create them ahead
[30:59] of time and there
[31:04] are various secrets
[31:10] that we have to
[31:15] create. Let's see. Okay.
[31:21] Secret manager secret.
[31:26] Here it is. So
[31:29] for example, our
[31:33] Blueberry, the application, it connects to GitLab to retrieve
[31:37] commit information, things like
[31:41] that. And so
[31:45] we need
[31:49] to, that is a personal access token that's created on the GitLab side
[31:52] and then we actually want to set that value. We
[31:56] actually want to retain that value in secret manager.
[32:00] So that's why we create a secret.
[32:04] So that's one secret
[32:10] that we use right
[32:15] there. So we create
[32:19] various things and I won't go too much
[32:22] into that but I did want to go into Argo CD
[32:26] and the setup for Argo CD. So the way
[32:29] that Argo CD is, it's GitOps which means
[32:33] that whatever version of the code is checked
[32:37] into the repository, it has some unique
[32:41] cache, and that is declared.
[32:45] And so that is what Argo CD will use.
[32:48] And so instead of having code
[32:52] with some variables, it'll say, why
[32:56] don't you write down the values of the
[32:59] variables in the file and I'll just pick
[33:03] it up. Maybe I can explain that a little
[33:07] better. But the Argo
[33:11] CD application will always look for
[33:14] how Argo CD, the applications that
[33:18] Argo CD has to manage, it'll look into
[33:22] usually some repository and the path
[33:25] is Argo CD dash apps. So in here we have
[33:30] our root application.
[33:35] Let's take a quick look at our root application here, the Blueberry
[33:39] root dev. So we can see these are the applications
[33:43] that the root Argo CD application is using. So
[33:47] we're using the app of apps pattern, which means
[33:50] our root is our master app and it manages all these applications
[33:54] like the actual Blueberry platform, an application for
[33:58] secrets. And then Blueberry
[34:02] also creates app of apps, right?
[34:07] For each environment, it'll create a master app
[34:10] that inside of it has one backend app and
[34:14] you know, zero or more front ends. So
[34:18] we see these four applications here
[34:22] and let's see what that looks like.
[34:26] What is this telling it to do?
[34:29] This is the application root and then here
[34:33] it is. It's saying, okay, go to this
[34:38] repository and then look at this
[34:41] path and this path is what our root
[34:45] application is. So the path is Argo
[34:49] CD apps overlays dev. So you see we have
[34:52] two folders. Basically, this is how we override
[34:56] Kubernetes manifest values through
[35:00] Argo CD a little different than with Helm
[35:03] charts. So in dev,
[35:10] we see that for the Blueberry app, Argo CD will
[35:14] override these variables. And
[35:18] in prod, we don't yet have values.
[35:22] When you look at the customization, you see, well, I'll
[35:26] have to look into this and get back to you
[35:29] with the bootstrap. Basically, we have this
[35:34] problem where Argo CD needs to, it's
[35:38] configured to look at code in this
[35:42] repo. And so it needs to be able to access
[35:46] GitLab. And so it needs a token for GitLab,
[35:49] right? And then once it's able to read those
[35:53] repositories, it's able to go on and use Secret
[35:56] Manager or whatever. But
[36:03] that GitLab token, we have to get it from somewhere. And so the approach that
[36:06] we're taking is we're creating an application called external
[36:10] secrets. External secrets basically brings into the
[36:14] environment secrets that are in Secret Manager,
[36:18] it'll essentially create a Kubernetes secret
[36:22] that points to the Secret Manager secret. So that's
[36:26] just a little bit about the setup
[36:30] there. So we're running Blueberry, we're running
[36:33] external secrets, and we're running Argo CD image updater.
[36:38] So when we're talking about the Blueberry
[36:41] platform, every time that we push code of
[36:45] the actual platform, we're going to build the image,
[36:49] we're going to push it, and then we're going to have this
[36:52] application called Argo CD image updater, which basically
[36:56] looks for new images and artifact registry.
[37:00] And as soon as the sees a new one, it'll just update your application. So
[37:04] in that way, Blueberry will be synced, right? That's the
[37:08] terminology that Argo CD uses, sync syncing. So
[37:11] that is the Argo CD image updater. For
[37:15] you'll notice that here, you don't see anything about an environment, and
[37:19] that's because there's not just one environment.
[37:23] So we're not declaring any environments
[37:27] here. The way that it works is now we have
[37:30] our Blueberry app, and our Blueberry app,
[37:34] you hit the end point, you go through the UI, whatever it is, and you
[37:37] create an environment there. You delete environments
[37:42] through different buttons or end
[37:45] points. Let's
[37:49] see. Okay,
[37:53] I think one last
[37:57] thing is, there are various
[38:01] variable defaults, and it's difficult
[38:04] to centralize that too much,
[38:08] right? Because there are certain
[38:12] places that just demand a default
[38:15] value, you can't just leave it empty. I'm going to
[38:19] think through this more. But basically, the app
[38:23] will first look at this file, and look at the values in
[38:26] this file. And then if there's an environment
[38:30] variable set, it'll override whatever's
[38:35] in the file. And if there's nothing in
[38:38] the app config, if there's nothing in the environment,
[38:42] then it typically has some default value,
[38:46] or it'll throw an
[38:49] error. This app was made
[38:54] using Python Fast API,
[38:59] HTMX, and Alpine JS. So far, it was
[39:02] a good experience. I feel like Alpine makes
[39:06] it easier to separate out logic, keep
[39:10] it clean, JavaScript. So I
[39:14] really enjoyed that. And of course,
[39:17] I use Claude. I use Cursor. I use the
[39:21] models o3, Sonnet 04, and
[39:25] Opus 04. Thank you. Chat soon.